Blackpug Tips for Units
Find these tips at shac.org/bp#tips
Blackpug and District Website Support: shac.org/bp
Helpful Registration Videos
How to Login:
How to add Merit Badges:
How to view event numbers, payments made, balance due
- Go to https://scoutingevent.com/000/Login/
- Click on profile name (top right)
- Click on View Activity (tabs: Summer Camp & Activities or Year Round Camping)
- Select the activity
- Click on Summary Tab
How to make a payment
- Go to https://scoutingevent.com/000/Login/
- Click on profile name (top right)
- Click on View Activity (tabs: Summer Camp & Activities or Year Round Camping)
- Select the activity
- Click on Payment Tab
How to view payment schedule
- Go to https://scoutingevent.com/000/Login/
- Click on profile name (top right)
- Click on View Activity (tabs: Summer Camp & Activities or Year-Round Camping)
- Select the activity
- Click on Participants Tab
- Click on View Registration
- Under first Registration Contact, select Additional Actions
- - Payment Schedule
How to view payment history
- Go to https://scoutingevent.com/000/Login/
- Click on profile name (top right)
- Click on View Activity (tabs: Summer Camp & Activities or Year Round Camping)
- Select the activity
- Click on Participants Tab
- Click on View Registration
- Under first Registration Contact, select Additional Actions
- - Payment History
How to manage participant classes
- Go to https://scoutingevent.com/000/Login/
- Click on profile name (top right)
- Click on View Activity (tabs: Summer Camp & Activities or Year Round Camping)
- Select the activity
- Click on Participants Tab
- Click on View Registration
- Under first Registration Contact, select Additional Actions
- Change Participant Type
How to change participant type
- Go to https://scoutingevent.com/000/Login/
- Click on profile name (top right)
- Click on View Activity (tabs: Summer Camp & Activities or Year Round Camping)
- Select the activity
- Click on Participants Tab
- Click on View Registration
- Under first Registration Contact, select Additional Actions
- Change Participant Type
How to edit billing info
- Go to https://scoutingevent.com/000/Login/
- Click on profile name (top right)
- Click on View Activity (tabs: Summer Camp & Activities or Year Round Camping)
- Select the activity
- Click on Participants Tab
- Click on View Registration
- Under first Registration Contact, select Additional Actions
- - Edit Billing Info
Parent Portal: How to give parents access to make payments and change class schedule (ideal for long-term camps like summer camp)
The Parent Portal is a customizable feature that allows unit leaders to provide parents with limited, secure access to their child's event registration. This enables parents to view event details, make payments, add participant information, and select classes or activities for their specific Scout(s), such as merit badge classes at summer camp. The unit leader determines the specific permissions parents have within the portal, such as whether they can make payments or only view information.
How to add participant names
- Go to https://scoutingevent.com/000/Login/
- Click on profile name (top right)
- Click on View Activity (tabs: Summer Camp & Activities or Year Round Camping)
- Select the activity
- Click on Participants Tab
- Click on Update Information button for each participant
- Video
How to add / delete participants
Note: this feature may be turned off for some events
- Go to https://scoutingevent.com/000/Login/
- Click on profile name (top right)
- Click on View Activity (tabs: Summer Camp & Activities or Year Round Camping)
- Select the activity
- Click on Participants Tab
- Click on Registration Contact
- Select Additional Actions Dropdown
- Select Add or Delete Participants
- Video
How to View Reports
- Go to https://scoutingevent.com/000/Login/
- Click on profile name (top right)
- Click on View Activity (tabs: Summer Camp & Activities or Year Round Camping)
- Select the activity
- Click on Reports Tab
Merit Badge Event Reports
A variety of reports are available:
| |
- Preparing for the Event |
⇒ Class Schedule Checklist Sheet: report Scouts can use to indicate which classes they are interested in (print a copy for each Scout)
⇒ Unit Roster: Scoutmaster report with a list of all Scouts attending with check boxes to keep track of things like medical forms
⇒ Unit Roster Registrant: Scoutmaster report with a list of all Scouts by registrant type attending with check boxes to keep track of things like medical forms
⇒ Prerequisites by Scouts: a report for Scouts listing prerequisites they should work on before the event (one page per Scout).
⇒ Prerequisites by Unit: summarizes all prerequisites that Scouts should work on before the event, making it useful for planning troop meetings le |
| |
- Print Before Arrival |
⇒ Class Schedule or Participant Class Schedule: two types of reports for Scouts with their merit badge schedule (one page per Scout)
⇒ Scout Summary: summarizes all Scouts' schedules.
⇒ Period Summary: lists where every Scout should be each period.
⇒ Class Summary: lists Scouts taking each class
⇒ Scoutmaster QR Codes: QR codes for the unit and each Scout used to access class and merit badge schedules on mobile devices. |
| |
- After the Event |
⇒ Scoutbook Export: is a report of all merit badge completions that can be uploaded into Scoutbook so Scout's get credit for advancements completed. Note: rank advancements have to be entered manually.
⇒ Unit Advancement Summary: summarizes all advancements completed at camp (e.g., merit badges, rank advancements)
⇒ Unit Advancement Detail: list of all advancements completed at camp in a grid (one page per Scout) |
| |
- Resources |
⇒ Class Data: Excel report listing all Scouts and merit badge classes
⇒ Customer Invoice: shows all payments
⇒ Event Additional Fees: lists any additional fees |
Scoutbook Uploads
After an event, the person who registered the troop, the Scoutmaster, and Committee Chair, can pull advancement reports.
A variety of reports are available:
⇒ Unit Advancement Summary: summarizes all advancements completed at camp (e.g., merit badges, rank advancements)
⇒ Unit Advancement Detail: list of all advancements completed at camp in a grid (one page per Scout)
⇒ Scoutbook Export: is a report of all merit badge completions that can be uploaded into Scoutbook so Scout's get credit for advancements completed. Note: rank advancements have to be entered manually.
Scoutbook Export Report Instructions: This report exports merit badge data in Scoutbook format using Scoutbook's "advancement.csv" template. Cub Scout awards are excluded because Scoutbook doesn't upload those. Chrome Users - an extension is available that allows direct import of this data into Scoutbook. This extension can be obtained here: Feature Assistant Extension for Scoutbook. Firefox Users - a similar extension for Firefox can be obtained here: Feature Assistant - Scoutbook. A document describing the upload process can be found here: Importing Summer Camp Data from Black Pug Software
Videos
Volunteer Tips
Login to Blackpug: • Go to https://247scouting.com/Login. • Select Login (top right). [If an account was set up for you, search your email for no-reply@247scouting.com to see the password set up. If you don’t know your password, select Forgot Password. Your user name is typically your firstname.last name. If it doesn't work, email darlene.scheffler@gmail.com]
There are two login URLs (one to pull reports and one to personally register you and your unit)
Support:
EVENTS
How to see registration numbers
How to see income
- Go to https://247scouting.com/Login
- Select Login (top right).
- Click on the Golden Ticket icon (at the top).
- Type in the name of the event in the search box.
- Click on the Event dropdown and then Summary.
How to pull reports: EVENTS (with a specific date):
-
 Click to Exclude In-Progress Participants
Go to https://247scouting.com/Login
Click to Exclude In-Progress Participants
Go to https://247scouting.com/Login
- Select Login (top right).
- Click on the Golden Ticket icon (at the top).
- Type in the name of the event in the search box
- Click on the 3 dots on the right, then select “Reporting.”
- Click on “Event Operations.”
- Click on “Miscellaneous.”
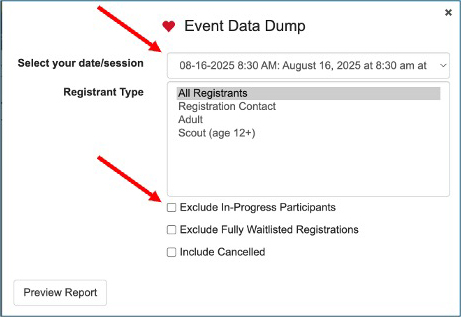
- For a full report: Select “Event Data Dump.” Then, I recommend you click on the Heart at the top because this will be a favorite report for you.
- Important: check "Exclude In-Progress Participants"
- Select Preview Report. The report will be in your Downloads as a .cvs file (Event_Data_Dump)
Alternate way to pull reports
- Go to https://247scouting.com/Login
- Select Login (top right).
- Click on the Gold Ticket icon (at the top).
- Type in the name of the event in the search box.
- Click on the event
- Select the Event dropdown, then select “Reporting.”
- Click on “Event Operations.”
- Click on “Miscellaneous.”
- For a full report: Select “Event Data Dump.” Then, I recommend you click on the Heart at the top because this will be a favorite report for you.
Important: check "Exclude In-Progress Participants"
- Select Preview Report. The report will be in your Downloads as a .cvs file (Event_Data_Dump)
----------------------------------------------------------------------------
Custom / Partial Report
- Go to https://247scouting.com/Login
- Select Login (top right). If you don’t know your password, select Forgot Password.
- Click on the Gold Ticket icon (at the top).
- Type in the name of the event in the search box then click on the event and press “Enter” button.
- Click on the 3 dots on the right, then select “Reporting.”
- Click on “Event Administration”
- Click on “Miscellaneous.”
- Select “Custom Field Selection.”
- Select the custom fields (hold down the Shift Key to select more than one field).
- Then Select date event
- Then change dropdown to CSV.
- Then select Preview Report
----------------------------------------------------------------------------
FORMS / SURVEYS:
Forms and surveys usually do not have a specific date and money is not collect. (e.g., RSVPs, volunteer sign up):
- Go to: https://247scouting.com/Login
- Select Login (top right).
- Click on the File Folder icon (top of page)
- Type Event Title in the search box then press “Enter” button.
- Click on the 3 dots on the right, then select Data.
- You will see all the submissions. Selecting “Form Data” will allow you to scroll through all the individual submissions. This might be useful if you want to just look at one.
- Select “Export to CVS.” Rename it to what you want. Then select “Click here to download”
Hints for Chair of Merit Badge Event
Find these tips at shac.org/bp#tips
Blackpug and District Website Support: shac.org/bp
Volunteer Tips
Login: • Go to https://247scouting.com/Login. • Select Login (top right). [If an account was set up for you, search your email for no-reply@247scouting.com to see the password set up. If you don’t know your password, select Forgot Password. Your user name is typically your firstname.last name. If it doesn't work, email darlene.scheffler@gmail.com]
How to see registration numbers
- Go to https://247scouting.com/Login
- Select Login (top right).
- Click on the Gold Ticket icon (at the top).
- Type in the name of the event in the search box
- Click on the Event dropdown and then Summary.
----------------------------------------------------------------------------
Report: How many are registered for each class
- Go to https://247scouting.com/Login
- Select Login (top right).
- Click on the Gold Ticket icon (at the top).
- Type in the name of the event in the search box then click on the event and press “Enter” button.
- Click on the 3 dots on the right, then select “Reporting.”
- Click on “Classes”
- Click on “Miscellaneous.”
- Select “Attendee Counts - summarized list by Class.” [Recommend clicking the Heart at the top to mark as a favorite report.]
----------------------------------------------------------------------------
Full report Events (e.g., merit badge event)
- Go to https://247scouting.com/Login
- Select Login (top right).
- Click on the Gold Ticket icon (at the top).
- Type in the name of the event in the search box
- Click on the 3 dots on the right, then select “Reporting.”
- Click on “Event Operations.”
- Click on “Miscellaneous.”
- For a full report: Select “Event Data Dump.” [Recommend clicking the Heart at the top to mark as a favorite report.]
- Important: check "Exclude In-Progress Participants"
- Select Preview Report. The report will be in your Downloads as a .cvs file (Event_Data_Dump)
Alternate way to pull reports
- Go to https://247scouting.com/Login
- Select Login (top right).
- Click on the Gold Ticket icon (at the top).
- Type in the name of the event in the search box.
- Click on the event
- Select the Event dropdown, then select “Reporting.”
- Click on “Event Operations.”
- Click on “Miscellaneous.”
- For a full report: Select “Event Data Dump.” [Recommend clicking the Heart at the top to mark as a favorite report.]
Important: check "Exclude In-Progress Participants"
- Select Preview Report. The report will be in your Downloads as a .cvs file (Event_Data_Dump)
----------------------------------------------------------------------------
Custom (Partial) Report
- Go to https://247scouting.com/Login
- Select Login (top right).
- Click on the Gold Ticket icon (at the top).
- Type in the name of the event in the search box then click on the event and press “Enter” button.
- Click on the 3 dots on the right, then select “Reporting.”
- Click on “Event Administration”
- Click on “Miscellaneous.”
- Select “Custom Field Selection.”
- Select the custom fields (in this case Volunteer Preferences). There might be more than one dietary question, so hold down the Shift Key to select more than one field.
- Then Select date event
- Then change dropdown to CSV.
- Then select Preview Report
-------------------------------------------------------------------------------
Diet Report
 Go to https://247scouting.com/Login
 - Click on Gold Ticket icon
- Search Event
- Click on Event dropdown, select Reporting
- Click on “Classes”
- Click on “Miscellaneous.”
- Select “Class Roster CSV.”
- Hold down the Shift Key to select more than one field. Select:
- Dietary Restrictions Needed (sort by Yes/No)
- Registrant Type (sort by Unit and Individual to know if Saturday only or weekend)
- Dietary Restrictions
----------------------------------------------------------------------------
Report: Print Scout's Schedules
- Go to https://247scouting.com/Login
- Select Login (top right). If you don’t know your password, select Forgot Password.
- Click on the Gold Ticket icon (at the top).
- Type in the name of the event in the search box then click on the event and press “Enter” button.
- Click on the 3 dots on the right, then select “Reporting.”
- Click on “Customer Reports”
- Select 1 of 3 reports: [Recommend clicking the Heart at the top to mark as a favorite report.]
→ Class Schedule: report with every Scout's schedule on a separate page
→ Class Summary: Scoutmaster report showing Scouts by class
→ Period Summary: Scoutmaster report showing where Scouts should be every period.
----------------------------------------------------------------------------
Report: Rosters for Merit Badge Counselors with Requirements Grid
⇒ Remind the counselors to turn this grid immediately after the class. They can take a pic on their phone if they need a copy.
⇒ Remind the counselors to take attendance. If there is anyone in the class who is not on the roster, they must go to HQ, register, and obtain a pass to take the class.
- Go to https://247scouting.com/Login
- Select Login (top right).
- Click on the Gold Ticket icon (at the top).
- Type in the name of the event in the search box then click on the event and press “Enter” button.
- Click on the 3 dots on the right, then select “Reporting.”
- Click on “Class-Check In”
- Click on “Scheduled Badge Sheets.”
- Select “Requirement Grid” [Recommend clicking the Heart at the top to mark as a favorite report.]
----------------------------------------------------------------------------
Reports in Forms Section (e.g., volunteer sign up to teach merit badge):
- Go to: https://247scouting.com/Login
- Select Login (top right).
- Click on the File Folder icon (top of page)
- Type Event Title in the search box then press “Enter” button.
- Click on the 3 dots on the right, then select Data.
- You will see all the submissions. Selecting “Form Data” will allow you to scroll through all the individual submissions. This might be useful if you want to just look at one.
- Select “Export to CVS.” Rename it to what you want. Then select “Click here to download”
----------------------------------------------------------------------------
Custom Report (helpful for pulling partial reports)
- Click on “Classes”
- Click on “Miscellaneous.”
- Select “Class Roster CSV.”
- Hold down the Shift Key to select the custom fields.
After the event: - enter merit badge completions
- Go to https://247scouting.com/Login
- Select Login (top right).
- Click on the Gold Ticket icon (top toolbar).
- Type Event Title in the search box then press “Enter” button.
- Under Event on the toolbar, click Check-in in the dropdown.
- Select Class Tab
- Select the class using the Class dropdown (upper right of gray box)
- Check off requirements
--------------------------------------------------------------------------------------------------------------------------------------------------------------------------------------------------------------------------------------------------------------------------------
INSTRUCTIONS FOR UNIT LEADERS
Merit Badge Event Reports
A variety of reports are available:
| |
- Preparing for the Event |
⇒ Class Schedule Checklist Sheet: report Scouts can use to indicate which classes they are interested in (print a copy for each Scout)
⇒ Unit Roster: Scoutmaster report with a list of all Scouts attending with check boxes to keep track of things like medical forms
⇒ Unit Roster Registrant: Scoutmaster report with a list of all Scouts by registrant type attending with check boxes to keep track of things like medical forms
⇒ Prerequisites by Scouts: a report for Scouts listing prerequisites they should work on before the event (one page per Scout).
⇒ Prerequisites by Unit: summarizes all prerequisites that Scouts should work on before the event, making it useful for planning troop meetings le |
| |
- Print Before Arrival |
⇒ Class Schedule or Participant Class Schedule: two types of reports for Scouts with their merit badge schedule (one page per Scout)
⇒ Scout Summary: summarizes all Scouts' schedules.
⇒ Period Summary: lists where every Scout should be each period.
⇒ Class Summary: lists Scouts taking each class
⇒ Scoutmaster QR Codes: QR codes for the unit and each Scout used to access class and merit badge schedules on mobile devices. |
| |
- After the Event |
⇒ Scoutbook Export: is a report of all merit badge completions that can be uploaded into Scoutbook so Scout's get credit for advancements completed. Note: rank advancements have to be entered manually.
⇒ Unit Advancement Summary: summarizes all advancements completed at camp (e.g., merit badges, rank advancements)
⇒ Unit Advancement Detail: list of all advancements completed at camp in a grid (one page per Scout) |
| |
- Resources |
⇒ Class Data: Excel report listing all Scouts and merit badge classes
⇒ Customer Invoice: shows all payments
⇒ Event Additional Fees: lists any additional fees |
Scoutbook Uploads
After an event, the person who registered the troop, the Scoutmaster, and committee chair, can pull advancement reports.
A variety of reports are available:
⇒ Unit Advancement Summary: summarizes all advancements completed at camp (e.g., merit badges, rank advancements)
⇒ Unit Advancement Detail: list of all advancements completed at camp in a grid (one page per Scout)
⇒ Scoutbook Export: is a report of all merit badge completions that can be uploaded into Scoutbook so Scout's get credit for advancements completed. Note: rank advancements have to be entered manually.
Scoutbook Export Report Instructions: This report exports merit badge data in Scoutbook format using Scoutbook's "advancement.csv" template. Cub Scout awards are excluded because Scoutbook doesn't upload those. Chrome Users - an extension is available that allows direct import of this data into Scoutbook. This extension can be obtained here: Feature Assistant Extension for Scoutbook. Firefox Users - a similar extension for Firefox can be obtained here: Feature Assistant - Scoutbook. A document describing the upload process can be found here: Importing Data from Black Pug Software